Table of Contents
ToggleDeck railing planters solve two common outdoor design challenges: limited floor space and bare vertical surfaces. They turn unused railing real estate into a living garden without sacrificing deck square footage. Whether the homeowner is working with a narrow balcony or a sprawling backyard deck, railing planters add color, soften hard edges, and create privacy screens using living plants. The right setup can transform a basic deck into a layered outdoor room without the footprint of traditional containers.
Key Takeaways
- Deck railing planters maximize growing space by transforming vertical surfaces into a living garden without consuming deck floor area, freeing up valuable real estate for furniture and foot traffic.
- Hook-style, bracket-mounted, saddle, and hanging planter designs each suit different railing types and weight capacities, so measuring your railing dimensions and weight requirements before purchase is essential.
- Trailing plants like ivy geraniums and petunias, compact herbs such as basil and thyme, and drought-tolerant succulents are ideal choices for the limited soil volume and increased sun exposure of railing planters.
- Secure installation requires inspecting the railing structure first, using lightweight potting mix, and avoiding over-torquing fasteners on composite railings to prevent cracks or instability.
- Railing planters need daily or twice-daily watering during summer, regular deadheading to maintain compact growth, and mid-season hardware inspections to ensure brackets and hooks remain tight against temperature swings and plant weight.
- Material selection—galvanized steel, powder-coated aluminum, cedar, or resin—directly affects longevity and weather resistance, so match planter finishes to your deck’s aesthetic while prioritizing drainage holes and drip prevention.
What Are Deck Railing Planters and Why Use Them?
Deck railing planters are containers designed to mount on, hang from, or clamp onto horizontal deck railings. Unlike traditional floor planters, they attach securely to the railing structure, typically using brackets, hooks, or saddle-style cradles that straddle the top rail.
The main advantage is space efficiency. A 12-foot railing section can support six to eight planters without using any deck floor area. That’s valuable real estate freed up for furniture, grills, or foot traffic. They also elevate plants to eye level, making them easier to water, deadhead, and appreciate without bending.
Railing planters work particularly well for renters or condo owners who can’t modify deck surfaces. Most designs install and remove without drilling holes or permanent fixtures, making them a reversible upgrade.
Types of Deck Railing Planters to Consider
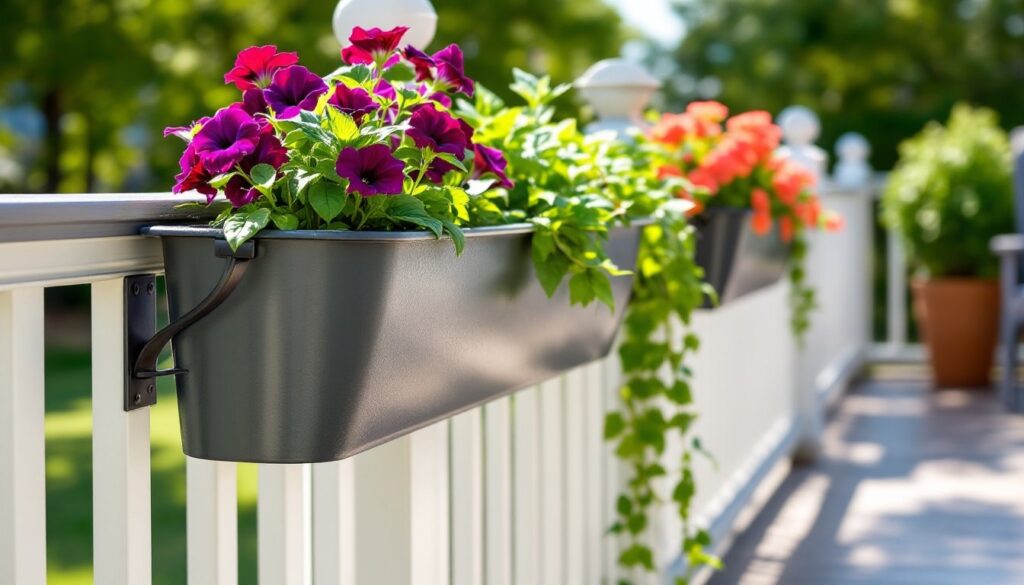
Hook-style planters hang over the railing like a saddle. They’re typically made from metal or molded resin with curved hooks that grip the top rail. These work best on standard 2×4 or 2×6 cap rails and require no tools to install. Many zinc rectangular rail planters use this system, offering a clean modern look that suits contemporary decks.
Bracket-mounted boxes attach using adjustable brackets that clamp or screw onto balusters or rails. They offer more stability than hook models, especially for larger plantings or windy locations. The brackets usually accommodate varying railing widths, but confirming compatibility before purchase saves return trips.
Deck rail saddle planters rest on top of the rail with legs that hang down on both sides, distributing weight evenly. These self-balancing designs suit wider plantings, often 24 to 36 inches long, and can handle heavier soil loads. They’re ideal for herb gardens or dense flower arrangements.
Hanging planters with S-hooks work on railings with horizontal cable or wire infill systems. They attach to cables rather than wood or composite rails, making them suitable for modern cable railing designs where traditional clamp-on models won’t fit.
Material choice affects longevity. Galvanized steel and powder-coated aluminum resist rust in wet conditions. Cedar and treated wood blend with traditional deck aesthetics but require seasonal sealing. Resin and heavy-duty plastic planters won’t rot or corrode, though UV exposure can cause fading and brittleness over 3-5 years.
How to Choose the Right Railing Planter for Your Deck
Start by measuring the railing. Nominal 2×6 cap rails (actual size 1.5″ × 5.5″) are standard on most decks, but some use 2×4 caps or composite profiles with different dimensions. Hook-style planters specify maximum rail width, exceeding that dimension means the planter won’t grip securely.
Consider weight capacity. A 24-inch planter filled with moist potting soil weighs 15-20 pounds. Add plants and water, and total weight can hit 25-30 pounds. Lightweight hook planters work for small annuals and herbs, but larger arrangements need bracket-mounted or saddle designs that distribute load across multiple attachment points.
Wind exposure matters on upper-level decks or open sites. Tall plants in shallow planters catch wind like sails. If the deck faces prevailing winds, choose lower-profile planters or models with secondary safety straps. Some homeowners add a small screw eye into the deck rail and tie planters down with UV-resistant zip ties as insurance against gusts.
Match the planter style to existing deck materials. Traditional wood decks pair well with cedar or stained wood planters. Composite decking in gray tones looks sharp with black or charcoal metal boxes. Avoid mismatched metals, galvanized steel and raw copper can cause galvanic corrosion where they touch.
Drainage is non-negotiable. Every railing planter needs drainage holes to prevent root rot. If the planter sits directly on a cap rail, ensure runoff won’t stain the railing or drip onto seating areas below. Some designs include drip trays or angled drainage that directs water away from the deck.
Best Plants for Deck Railing Planters
Railing planters impose unique constraints: limited soil volume, increased sun and wind exposure, and faster moisture loss than ground-level beds. Plant selection should account for these factors.
Trailing plants create visual interest by spilling over the railing edge. Ivy geraniums, trailing petunias, and sweet potato vine all thrive in confined containers and tolerate full sun. Creeping Jenny and bacopa work in partial shade and add texture.
Compact herbs are practical choices for sunny railings. Basil, thyme, oregano, and parsley grow well in 6-8 inches of soil and provide fresh seasoning within arm’s reach of the grill. Rosemary tolerates drought but can become woody and top-heavy by late season, stake it or trim regularly to prevent tipping.
Dwarf perennials offer season-long interest without constant replanting. Coral bells (Heuchera), compact hostas, and ornamental grasses like ‘Elijah Blue’ fescue handle container life and return year after year in zones 5-9. They’re lower-maintenance than annuals but grow more slowly.
Succulents and sedums suit hot, dry exposures where watering access is limited. They store moisture in fleshy leaves and tolerate neglect better than most container plants. Hens-and-chicks (Sempervivum) and creeping sedum varieties create textured, low-water displays.
Avoid plants with aggressive root systems or those that require deep soil. Tomatoes, peppers, and other fruiting vegetables need 12-18 inches of soil depth and consistent moisture, conditions difficult to maintain in shallow railing planters. Similarly, large shrubs and ornamental grasses exceeding 24 inches in height create wind-catch issues and eventual instability.
Installation Tips for Secure and Stable Railing Planters
Before installation, inspect the railing. Check for loose balusters, rotted cap rails, or compromised fasteners. A railing planter adds weight and leverage, attaching it to deteriorated framing creates a safety hazard. If the railing wobbles or shows soft spots, address those structural issues first.
For hook-style planters, slide the hooks over the cap rail and adjust until the planter sits level. Most designs use gravity and friction to stay in place, but a small bead of clear silicone caulk between the hook and rail prevents sliding without permanent bonding. Remove excess caulk before it cures to avoid staining.
Bracket-mounted models typically clamp onto balusters or rails using adjustable brackets with thumb screws or wing nuts. Tighten fasteners snugly, but don’t over-torque, composite and PVC railings can crack under excessive pressure. Brackets should contact the railing at multiple points to distribute weight. If the planter includes screw holes for permanent mounting, pre-drill pilot holes to prevent splitting wood balusters.
Saddle planters require proper balancing. Position the planter so weight distributes evenly across the cap rail. If the design includes adjustable legs or stabilizing tabs, set them before adding soil. Some saddle models work better on railings with a flat top surface, rounded or angled cap rails may not provide stable seating.
Use lightweight, well-draining potting mix rather than garden soil. Standard potting mix weighs 75-90 pounds per cubic foot when wet, versus 100-120 pounds for topsoil. The weight savings adds up across multiple planters. Look for mixes labeled for containers, they include perlite or vermiculite for drainage and peat or coir for moisture retention.
Fill planters on the deck rather than lifting them fully loaded. A 30-inch planter can weigh 40+ pounds when planted and watered, awkward to maneuver and easy to drop. Install empty planters, then add soil and plants in place.
Safety note: Wear work gloves when handling metal planters with sharp edges, and use eye protection if drilling pilot holes for brackets. If working on an elevated deck, consider a spotter to hand up planters and materials.
Maintenance and Care for Your Deck Railing Garden
Railing planters dry out faster than ground-level containers due to increased sun exposure and wind. During peak summer, they may need daily watering, sometimes twice daily in hot, dry climates. The smaller the planter, the more frequently it’ll need water. A moisture meter helps avoid guesswork, especially for planters on high decks where visual inspection is difficult.
Drip irrigation or soaker hoses save time if the homeowner is managing six or more planters. A 1/4-inch drip line can run along the railing with emitters positioned in each planter. Timer-controlled systems automate watering, though they require a nearby hose bib and seasonal winterization in freezing climates.
Fertilize container plants more often than garden beds. Frequent watering leaches nutrients from potting mix quickly. A balanced, water-soluble fertilizer applied every 2-3 weeks keeps annuals blooming and herbs productive. Slow-release granular fertilizers work for perennials and low-maintenance plantings, they feed for 3-6 months and reduce application frequency.
Deadheading spent blooms and trimming leggy growth keeps plants compact and encourages new flowers. Trailing plants can grow aggressively by midsummer, trim them back to prevent excessive weight on one side of the planter, which can cause tipping.
Inspect hardware mid-season. Temperature swings, moisture, and plant weight can loosen brackets or hooks over time. Tighten fasteners as needed and check for rust or corrosion on metal components. If using painted or powder-coated planters, touch up chips to prevent rust from spreading.
In fall, remove annuals and spent soil. Perennials in railing planters need winter protection in cold climates, roots are more exposed to freezing than in-ground plants. Options include moving planters to a sheltered location, wrapping them with insulation, or replanting perennials in the ground before hard frost. Empty planters should be cleaned, dried, and stored indoors or upside-down to prevent ice damage.
For those looking to build custom rail planters, free DIY furniture plans offer step-by-step guides suited to various skill levels. Outdoor design ideas can also inspire plant combinations and styling approaches for different regions.
Conclusion
Deck railing planters maximize growing space without sacrificing deck floor area, making them ideal for small outdoor areas or anyone wanting more greenery at eye level. Choosing the right planter style, selecting appropriate plants, and ensuring secure installation creates a low-maintenance vertical garden that enhances the deck’s usability and appearance season after season.