Table of Contents
ToggleTermites cause over $5 billion in property damage annually in the United States, damage that homeowners’ insurance typically won’t cover. That’s why catching an infestation early and treating it yourself can save thousands compared to professional extermination services. DIY termite treatment isn’t always appropriate for every situation, but when conditions are right, homeowners can effectively eliminate colonies using methods that professionals rely on. This guide covers proven treatment options, application techniques, and the honest truth about when you should tackle the job yourself versus calling in a licensed pest control operator.
Key Takeaways
- DIY termite treatment using liquid termiticides or bait stations can save thousands compared to professional services when infestations are localized and caught early.
- Confirm termite type and severity by checking for mud tubes, hollow-sounding wood, and discarded wings before purchasing any treatment products.
- Liquid termiticide barriers and bait stations are the most effective DIY methods, using the same active ingredients (fipronil, imidacloprid) that professionals rely on.
- Termite treatment requires ongoing monitoring for 6-12 months to confirm colony elimination, not a one-time application, so commit to regular inspections.
- Call a licensed pest control operator when termites damage structural components, infestations are widespread, or subslab drilling and complex applications exceed DIY capability.
- Combining moisture control measures—fixing leaky pipes, improving drainage, and removing wood-to-soil contact—makes your home inhospitable and prevents termite return.
Understanding Termite Infestations Before You Treat
Before buying any treatment products, homeowners need to confirm they’re dealing with termites and understand the severity of the problem. Subterranean termites (the most common type) live in the soil and build mud tubes up foundation walls to access wood. Drywood termites, more common in coastal and southern states, live entirely within the wood they consume and leave tiny fecal pellets that look like sawdust.
Look for these signs: mud tubes along foundation walls or floor joists, hollow-sounding wood when tapped, discarded wings near windows or doors (swarmers shed them after mating), or visible galleries inside damaged wood. Small infestations caught early, say, one or two mud tubes in a crawlspace, are manageable DIY projects. Widespread damage across multiple floor joists, structural beams, or throughout wall cavities usually requires professional intervention.
Termites need three things: moisture, wood, and soil contact (for subterranean species). Eliminating any of these makes your home less hospitable. Fix leaky pipes, improve drainage around the foundation, remove wood-to-soil contact (deck posts, firewood piles, landscaping timbers), and ensure crawlspace ventilation is adequate. Moisture meters (available for under $30) help identify problem areas where relative humidity exceeds 20% in wood, the threshold where termites thrive.
Understand that termite treatment is not a one-and-done job. Colonies can contain hundreds of thousands of insects, and reproductive cycles mean new swarmers emerge seasonally. Effective DIY treatment requires monitoring over 6-12 months to confirm elimination. If you’re not prepared for that commitment, professional treatment with a warranty makes more sense.
Top DIY Termite Treatment Methods That Actually Work
Liquid Termiticide Barriers
Liquid termiticides create a treated zone in the soil around your foundation that kills termites on contact or when they return to the colony. Products containing fipronil (like Taurus SC) or imidacloprid (such as Dominion 2L) are the same active ingredients professionals use. These are non-repellent, meaning termites can’t detect the chemical and unknowingly carry it back to the colony, spreading the toxin.
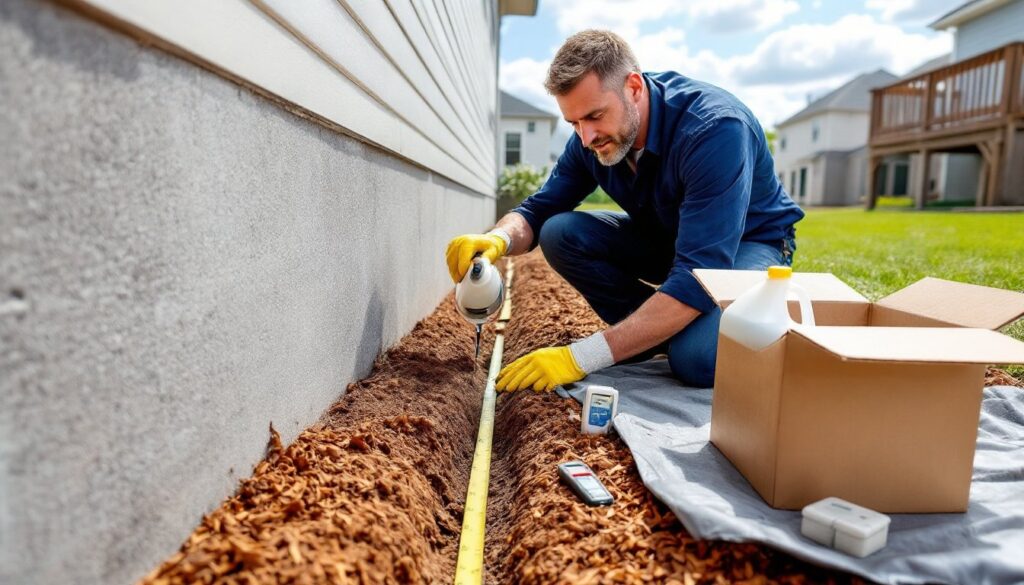
Application requires trenching around the foundation perimeter and treating the soil. For a typical foundation, you’ll need to apply 4 gallons of diluted solution per 10 linear feet at a depth of 6 inches and width of 6 inches. That’s roughly 0.8 gallons per linear foot for a complete barrier. A 1,500-square-foot home with a 200-foot perimeter needs about 160 gallons of finished solution. Most concentrate bottles make 20-80 gallons depending on dilution rate, so calculate your needs before purchasing.
Challenges include physical labor, digging a trench around your entire foundation in clay or rocky soil is demanding work. You’ll also need a pump sprayer (2-4 gallon capacity with adjustable nozzle) or a soil injector for subslab treatments. Liquid treatments last 5-10 years if applied correctly, making them cost-effective over time. But, they require drilling through concrete slabs or treating under porches, which adds complexity. Homeowners comfortable with DIY home repair projects often find this method manageable, especially for crawlspace or basement applications where soil is accessible.
Termite Bait Stations
Bait stations work differently, they don’t create a chemical barrier but instead attract termites to consume poisoned food that they carry back to the colony. Hex Pro and Spectracide Terminate are popular DIY systems. Each station contains cellulose material (termites’ natural food source) laced with slow-acting toxins like hexaflumuron or noviflumuron, which inhibit termites’ ability to molt.
Install stations every 10 feet around the foundation perimeter, buried flush with the soil surface. For a 200-foot perimeter, that’s 20 stations minimum. Initial setup is less labor-intensive than liquid treatments, just dig a hole with a bulb planter or post-hole digger, insert the station, and backfill. The trade-off? Bait stations require monthly inspections for the first year to check for termite activity and replace consumed bait.
Bait systems shine when you can’t trench (concrete patios, mature landscaping, or areas where soil injection isn’t feasible). They’re also safer around wells, gardens, or areas with groundwater concerns since the toxin stays contained in the station. Colony elimination typically takes 3-6 months as workers gradually consume and distribute the bait. This slower timeline frustrates some DIYers, but it’s effective for established colonies that liquid barriers might miss if mud tubes bypass the treated zone.
Some homeowners combine both methods: liquid treatment where soil is accessible and bait stations in hard-to-treat areas. This integrated approach mirrors professional pest control strategies but requires careful budgeting and monitoring.
Step-by-Step Guide to Applying Your DIY Termite Treatment
Safety first: Termiticides are regulated pesticides. Wear nitrile gloves, safety goggles, long sleeves, and pants during mixing and application. Work in ventilated areas and keep children and pets away from treatment zones for 24 hours or until the soil dries.
For liquid termiticide barriers:
-
Measure and calculate. Walk the foundation perimeter with a measuring tape. Calculate total linear feet, then determine gallons of finished solution needed (typically 4 gallons per 10 linear feet).
-
Dig the trench. Using a flat-blade shovel, dig a trench 6 inches deep and 6 inches wide along the foundation. Pile the excavated soil on a tarp for easy backfilling. For crawlspaces, trench along interior foundation walls where termites access floor joists.
-
Mix the solution. Follow label dilution rates exactly, usually 0.06% to 0.125% active ingredient. For example, Taurus SC mixes at 0.8 fluid ounces per gallon of water. Use a 5-gallon bucket and stir thoroughly. Mix only what you’ll use in one session.
-
Apply evenly. Pour diluted termiticide into the trench using a pump sprayer or directly from a bucket, ensuring even distribution. For subslab treatments, drill ½-inch holes every 12 inches through the concrete at a 45-degree angle, inject solution using a soil injector, then patch holes with hydraulic cement.
-
Backfill and document. Replace the soil and tamp lightly. Mark treated areas on a diagram with the date, this helps track coverage and plan future inspections.
For bait station installation:
-
Map station locations. Mark spots every 10 feet around the foundation perimeter, 2-3 feet from the wall. Note areas with existing termite activity (near mud tubes or damaged wood) and place additional stations there.
-
Dig and install. Use a bulb planter or auger to dig holes slightly deeper than the station height. Insert stations so the lid is flush with the soil surface. Label each station with a number for inspection records.
-
Activate and bait. Insert the cellulose bait cartridge and monitoring base according to the manufacturer’s instructions. Some systems include an initial inspection cartridge to confirm termite presence before adding toxin-laced bait.
-
Inspect monthly. Check each station for termite activity. If you find feeding, replace with a toxic bait cartridge. Document which stations have activity, this reveals the colony’s foraging range.
-
Refresh as needed. Replace bait cartridges when consumed or every 3 months, whichever comes first. After 12 months of no activity, quarterly inspections are sufficient.
Both methods benefit from using a moisture meter to identify and fix areas with elevated wood moisture content. Termites won’t return if their environment is inhospitable. Repair grading issues, extend downspouts, and install vapor barriers in crawlspaces as part of your treatment plan.
When to Call a Professional vs. Going DIY
DIY termite treatment works best for localized, accessible infestations caught early. If you have a crawlspace or basement with visible mud tubes on one or two foundation walls, treating that area yourself is reasonable. Homeowners with basic workshop tools and DIY experience often handle perimeter trenching and bait station installation without issue.
Call a licensed pest control operator when:
-
Active termites are found in structural beams, floor joists, or wall studs supporting loads. Treating the symptom while ignoring compromised framing can lead to dangerous structural failure. Professionals assess damage and coordinate with contractors if repairs are needed.
-
Infestation is widespread across multiple rooms or exterior walls. This suggests a mature colony requiring aggressive treatment, often including fumigation for drywood termites.
-
Drilling through concrete slabs or foundation walls is necessary but you lack the equipment. Rotary hammers and soil injection rigs are expensive for one-time use, and improper drilling can crack slabs or damage utilities.
-
Post-construction guarantees or real estate transactions require documentation. Professional treatments include warranties (often 1-5 years) and official reports that satisfy lenders or buyers. DIY treatments don’t.
-
Your home has a well, septic system, or sits near water bodies. Pesticide applicators need specific training to treat these areas without contaminating groundwater. Regulations in many states require licensed operators for treatments near wells.
-
You’re not comfortable with pesticide handling or the physical labor involved. There’s no shame in hiring pros, misapplied DIY treatments waste money and may not eliminate the colony.
Many professionals offer partial treatment options where they handle difficult areas (slabs, inaccessible crawlspaces) while you treat accessible perimeter zones. This hybrid approach cuts costs while ensuring thorough coverage. Expect to pay $3-$8 per linear foot for professional liquid treatments or $1,200-$2,500 for whole-house bait systems, versus $200-$600 in materials for comparable DIY work.
Conclusion
DIY termite treatment using liquid termiticides or bait stations can effectively eliminate colonies when applied correctly and monitored consistently. Success requires accurate infestation assessment, proper safety protocols, and realistic expectations about the time commitment involved. For localized infestations and accessible treatment areas, homeowners save thousands while gaining valuable skills. But structural damage, widespread colonies, or complex subslab applications often justify professional treatment with warranties and guaranteed results.