Table of Contents
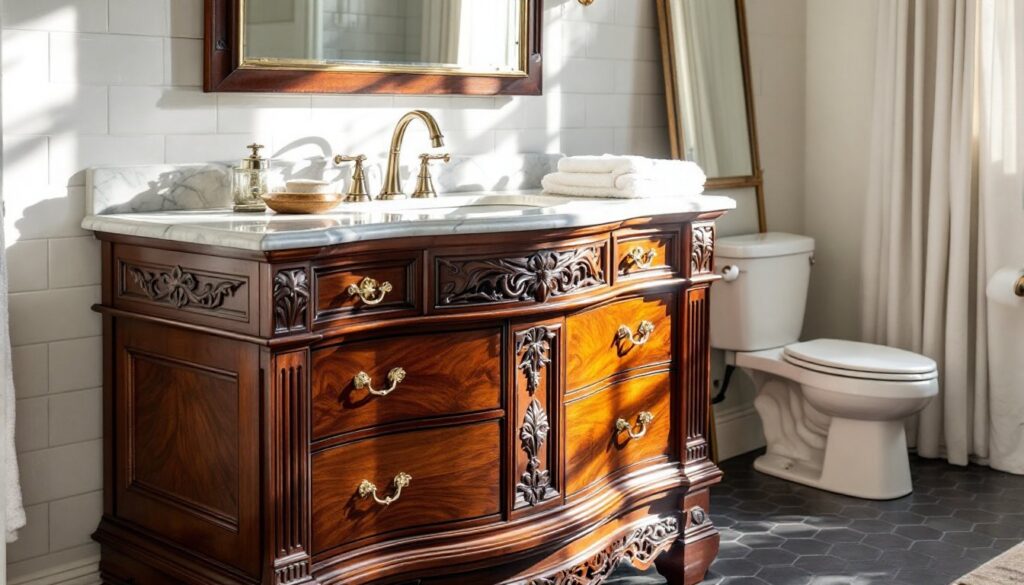
ToggleAn antique bathroom vanity brings warmth, history, and craftsmanship that mass-produced cabinetry can’t match. Whether it’s a repurposed dresser from the Victorian era or a genuine washstand with original hardware, these pieces anchor a bathroom with character that transcends fleeting trends. But turning a century-old furniture piece into a functional vanity requires more than enthusiasm, plumbing modifications, moisture protection, and structural reinforcement are all part of the equation. This guide walks through the process from sourcing to installation, helping homeowners blend vintage charm with modern plumbing requirements.
Key Takeaways
- An antique bathroom vanity must be at least 100 years old and features authentic joinery like dovetail joints, solid hardwoods, and original hardware that distinguish it from mass-produced alternatives.
- Converting an antique bathroom vanity requires critical waterproofing with marine-grade spar urethane or epoxy resin to protect the wood from moisture damage in humid bathroom environments.
- Antique bathroom vanities offer superior durability and unique character compared to modern vanities, while also supporting sustainability by repurposing existing furniture and reducing waste.
- Finding authentic pieces requires patience and sourcing from estate sales, antique dealers, and architectural salvage yards rather than retail stores, with careful inspection of structural soundness and dimensions.
- Plumbing installation demands adjustments for height variations and drain positioning, often requiring longer supply lines, offset tailpieces, and professional compliance verification with local plumbing codes.
- Successful antique bathroom vanity conversions prioritize solid structural bones over perfect finishes, and preserve original wood tops using vessel sinks or apply marine-grade finishes for maximum longevity.
What Makes a Bathroom Vanity Truly Antique?
The term “antique” gets thrown around loosely in home decor, but in the furniture world, it has a specific definition. Most collectors and appraisers consider a piece genuinely antique if it’s at least 100 years old. That places authentic antiques in the pre-1926 range as of 2026.
Vintage pieces, those between 20 and 100 years old, still offer character and quality craftsmanship but don’t carry the same historical weight. Both can make excellent bathroom vanities, though their value, durability, and restoration needs differ.
Key markers of an authentic antique include:
- Joinery methods: Dovetail joints, mortise-and-tenon construction, and hand-cut details instead of modern staples or screws
- Wood type: Solid hardwoods like oak, walnut, mahogany, or cherry rather than plywood or particleboard
- Hardware: Original brass, porcelain, or iron pulls and hinges with age-appropriate patina
- Construction marks: Hand-planed surfaces, irregular saw marks, or maker’s stamps
Repurposed antiques weren’t originally designed as vanities. Dressers, dry sinks, washstands, and commodes are the most common candidates for conversion. A genuine washstand from the 1890s may already have a bowl cutout and splash guard, making it easier to adapt for modern plumbing than a standard chest of drawers.
Why Choose an Antique Vanity for Your Bathroom?
Antique vanities deliver benefits that go beyond aesthetics, though the visual impact is undeniable. Here’s what they bring to a bathroom renovation:
Durability and craftsmanship: Furniture built a century ago used old-growth lumber and joinery techniques designed to last generations. Dovetail drawers and mortise-and-tenon frames hold up better than modern pocket screws and particle board. Many antiques outlast their contemporary counterparts by decades.
Unique character: No two antique pieces are identical. Grain patterns, hand-carved details, original hardware, and the patina of age create one-of-a-kind focal points. Mass-produced vanities can’t replicate the depth and history of a piece that’s survived 100+ years.
Sustainability: Repurposing existing furniture keeps it out of landfills and reduces demand for new manufacturing. Solid wood antiques can be refinished, repaired, and adapted indefinitely, a stark contrast to particleboard vanities that fail after a decade of moisture exposure.
Flexibility in sizing: Antique furniture comes in a wider range of dimensions than standard vanity cabinets (which typically run 24″, 30″, 36″, 48″, or 60″ wide). A vintage dresser might be 38″ or 42″ wide, filling awkward spaces perfectly.
Resale value: A well-executed antique vanity conversion often adds more to a home’s appeal than a stock unit. Buyers willing to pay premium prices for period details notice these touches.
Popular Antique Vanity Styles and Eras
Different periods produced distinct furniture styles, each bringing its own aesthetic to a bathroom. Matching the vanity to your home’s architecture creates cohesion, though mixing eras thoughtfully can work in eclectic spaces.
Victorian (1837–1901): Ornate carvings, dark woods like walnut and mahogany, marble tops, and heavy proportions. Washstands from this era often feature towel bars, tilting mirrors, and built-in splash backs. Expect substantial pieces that dominate smaller bathrooms but anchor larger spaces beautifully.
Edwardian (1901–1910): Lighter woods such as oak and satinwood, simpler lines than Victorian pieces, but still decorative. Inlaid details and tapered legs are common. These vanities suit transitional spaces that balance traditional and modern elements.
Art Deco (1920s–1930s): Geometric patterns, exotic veneers, chrome hardware, and streamlined forms. Waterfall-edge dressers from this period make striking vanities. The bold lines and symmetry complement Art Deco bathrooms with hexagonal tile and pendant lighting.
Farmhouse/Primitive (1800s–early 1900s): Dry sinks, pie safes, and simple pine or poplar pieces with painted finishes. These work especially well in modern farmhouse bathrooms where rustic textures balance contemporary fixtures.
Mid-Century Modern (1940s–1960s): Technically vintage rather than antique, MCM credenzas and sideboards with teak or walnut finishes, hairpin legs, and minimalist hardware create clean-lined vanities for contemporary spaces.
Consider your bathroom’s existing style, ceiling height, and square footage when selecting an era. A massive Victorian washstand overwhelms a 5×8 powder room, while a delicate Edwardian piece disappears in a master suite.
Where to Find Authentic Antique Bathroom Vanities
Sourcing quality antiques requires patience and a willingness to look beyond retail stores. Here’s where to focus your search:
Estate sales and auctions: These offer the best combination of authenticity and value. Estate sale companies often price furniture to move quickly, and you can inspect pieces in person before bidding. Arrive early on the first day for the best selection.
Antique dealers and shops: Higher prices than estate sales, but dealers curate inventory and can verify age and provenance. Reputable dealers stand behind their attributions and often have restoration contacts.
Online marketplaces: Facebook Marketplace, Craigslist, and Chairish list antiques daily, but authenticity verification falls on the buyer. Ask for measurements, close-ups of joinery and hardware, and photos of any damage. Be prepared to inspect in person before purchasing.
Architectural salvage yards: These specialize in building materials and fixtures but often carry vintage furniture. Prices vary widely based on condition and rarity.
Flea markets and consignment shops: Hit-or-miss options that require regular visits. Vendors may not know what they have, creating opportunities for knowledgeable buyers.
When evaluating a potential vanity, bring a tape measure, flashlight, and moisture meter if possible. Check for:
- Structural soundness (no loose joints, extensive rot, or active pest damage)
- Adequate depth for a sink basin and plumbing (minimum 18″ front to back)
- Drawer and door function
- Original finish condition
- Level top surface
Designers and homeowners have successfully transformed vintage cabinets into functional vanities by prioritizing pieces with solid bones over perfect finishes. Surface issues are fixable: structural failures are deal-breakers.
How to Restore and Prepare an Antique Vanity for Bathroom Use
Bathrooms are hostile environments for wood furniture. Moisture, temperature swings, and direct water contact will destroy an unprotected antique. Proper preparation is non-negotiable.
Step 1: Clean and assess
Strip old finishes with a citrus-based stripper or chemical remover appropriate for your wood type. Wear nitrile gloves, safety goggles, and work in a well-ventilated area. Remove all hardware and set aside. Inspect for loose joints, veneer damage, or rot once the finish is off.
Step 2: Repair structural issues
Re-glue loose joints with Titebond II or Titebond III (both are water-resistant). Clamp until fully cured, usually 24 hours. Replace missing veneer or fill gouges with wood filler matched to the species. Tighten or replace drawer slides if needed.
Step 3: Cut for plumbing
Measure your sink and faucet carefully. Undermount sinks require a cutout in the top surface: vessel sinks need only faucet holes. Trace the template (usually provided with the sink) and cut with a jigsaw fitted with a fine-tooth blade. A router with a template guide gives cleaner edges for undermount installations.
Drill holes for supply lines and drain tailpiece through the back panel. Use a spade bit or hole saw sized 1/4″ larger than your pipe diameter to allow movement and prevent cracking.
Step 4: Waterproof
This step separates a successful conversion from a moldy disaster. Apply three coats of marine-grade spar urethane or epoxy resin to all interior surfaces, the underside of the top, and any cutouts. Pay special attention to end grain, which absorbs moisture fastest. Let each coat cure fully per manufacturer instructions.
For the exterior, use a water-based polyurethane in satin or semi-gloss for traditional finishes, or a conversion varnish for maximum durability. Avoid oil-based finishes in humid bathrooms, they yellow and remain tacky.
Step 5: Install countertop and sink
Many converters replace the original top with marble, granite, or quartz for water resistance and visual impact. A stone fabricator can template and cut the piece with faucet and drain holes.
Alternatively, preserve the original wood top by sealing it heavily and using a vessel sink that sits on top rather than requiring a cutout. This approach maintains more of the antique’s integrity.
Step 6: Reattach hardware
Clean original pulls and hinges with brass polish or vinegar (depending on metal type). If hardware is missing, Remodelista and architectural salvage sources offer period-appropriate replacements. Match the mounting hole spacing to avoid new drill holes.
Installation Tips and Plumbing Considerations
Installing an antique vanity follows standard vanity installation procedures with a few adjustments for irregularities in older furniture.
Leveling and securing
Few antique pieces sit perfectly level after a century of settling. Use shims under the base to level front-to-back and side-to-side. Check with a 4-foot level on both the top surface and sides.
Secure the vanity to wall studs with 3-inch wood screws through a cleat attached to the back panel. Don’t screw directly through decorative back panels, you’ll split them. If the wall is tiled, use wall anchors rated for 50+ pounds and drill through grout lines when possible.
Plumbing connections
Most antiques sit higher than standard 30–32″ vanities. This extra height often means your existing supply lines and P-trap won’t align. You may need:
- Longer supply lines (braided stainless flex lines are easiest to work with)
- Offset drain tailpieces to accommodate the increased distance
- Trap adapters if the drain position shifts significantly
If the vanity lacks a back opening, you’ll need to notch or remove a section of the back panel to fit it over existing plumbing. Use a jigsaw or oscillating multi-tool for clean cuts.
Wall-mounted faucets simplify rough-in alignment but require opening the wall and installing blocking between studs at the correct height (usually 4–6″ above the sink rim). This is a good option for vessel sinks on tall pieces. Check your local plumbing code, some jurisdictions have specific requirements for faucet backflow prevention.
Drainage and venting
Antique vanities converted from dressers often shift the sink position away from existing drain locations. If the horizontal drain run increases beyond 6 feet, most codes require additional venting. This isn’t a DIY-friendly modification, hire a licensed plumber to ensure compliance with the International Plumbing Code (IPC) or Uniform Plumbing Code (UPC), whichever your jurisdiction follows.
Freestanding vs. built-in
Some homeowners prefer to keep antique vanities freestanding for easier removal and to maintain the furniture aesthetic. If you go this route, use a clear bead of silicone along the wall edge to prevent water from running behind the piece, but don’t rely on silicone for structural support.
Safety note: Always shut off water supply at the shutoff valves before disconnecting plumbing. Keep a bucket handy for residual water in lines. Wear safety glasses when cutting or drilling.
Conclusion
Converting an antique into a bathroom vanity merges function with history, creating a centerpiece that tells a story. The process demands careful waterproofing, precise plumbing modifications, and respect for the original piece’s integrity. Done right, an antique vanity delivers decades of service while adding character no showroom can replicate. Country Living showcases numerous examples of successful conversions that balance rustic charm with modern convenience, proof that old furniture still has plenty of life left when thoughtfully adapted.