Table of Contents
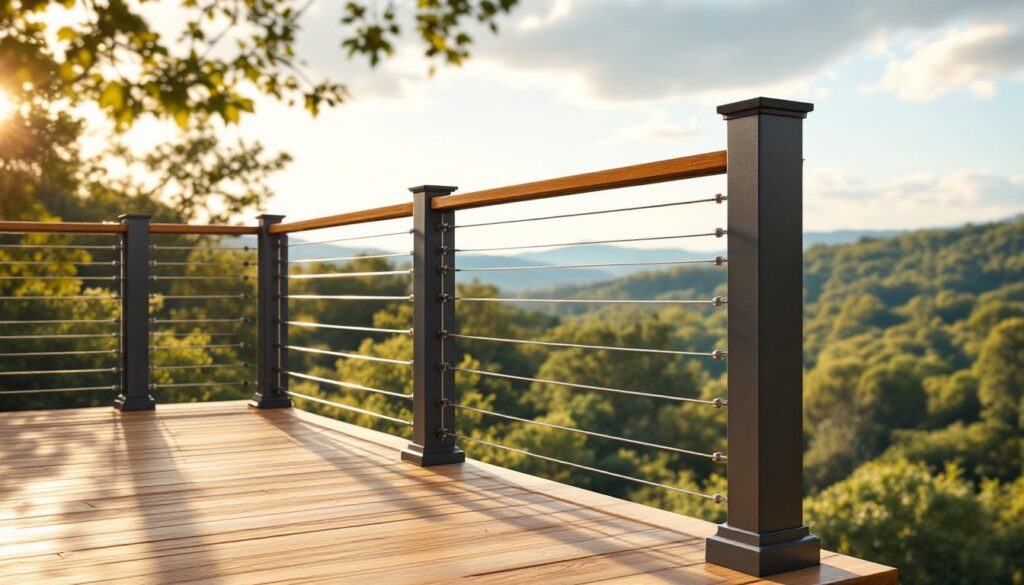
ToggleDeck wire railing has become one of the most popular choices for homeowners who want clean sight lines, minimal maintenance, and a contemporary look. Unlike traditional wood or metal picket railings, wire (or cable) systems use tensioned horizontal stainless steel cables strung between posts, creating an open, airy feel that doesn’t block views. They work beautifully on elevated decks overlooking yards, lakes, or city skylines, and they pair well with both modern and rustic architectural styles. This guide walks through everything needed to choose, install, and maintain a wire railing system, from material specs and code requirements to realistic cost breakdowns and upkeep tips.
Key Takeaways
- Deck wire railing systems provide unobstructed views and low maintenance compared to traditional wood or composite railings, making them ideal for elevated decks overlooking scenic locations.
- Stainless steel cables must be spaced no more than 4 inches apart per the International Residential Code, and proper tensioning (typically 300–350 pounds of force) is critical to prevent sagging and meet code compliance.
- Material costs for a wire railing project range from $60–$100 per linear foot for DIY kits to $100–$200 per linear foot for professional installation, with long-term savings realized through minimal maintenance requirements.
- Successful installation requires accurate post spacing, drilling, and cable tensioning—a moderate-to-advanced DIY project best left to professionals for two-story decks or when local codes require a stamped engineering plan.
- Wire railing systems demand routine maintenance including quarterly cable cleaning, annual tension checks, and periodic inspection of hardware and wooden posts to ensure safety and durability for 20+ years.
What Is Deck Wire Railing and Why Choose It?
A wire railing system uses horizontal stainless steel cables (typically 1/8″ or 3/16″ diameter) spaced evenly between vertical posts. The cables are tensioned to prevent sagging and meet code requirements for spacing, usually no more than 4 inches apart to comply with the International Residential Code (IRC) for guardrails. This prevents small children or pets from slipping through.
Homeowners choose wire railing for several practical reasons:
- Unobstructed views: The thin profile of cables doesn’t interrupt sight lines, making them ideal for scenic locations.
- Low maintenance: Stainless steel resists rust and doesn’t require painting or staining like wood balusters.
- Modern aesthetic: The sleek, industrial look complements contemporary home designs and high-end outdoor spaces.
- Durability: Marine-grade stainless steel (316 or higher) can withstand coastal salt air and extreme weather.
There are trade-offs. Wire railing requires precise installation to maintain proper tension, and upfront material costs run higher than pressure-treated wood balusters. Posts must be sturdy enough to handle the lateral load from tensioned cables, this isn’t a system you can retrofit onto flimsy framing without reinforcement.
Types of Wire Railing Systems for Decks
Wire railing systems fall into three main categories based on how the cables attach and tension:
Surface-mount systems anchor posts to the deck surface using heavy-duty base plates. The cables run through holes drilled in the posts or attach to surface fittings. This type works well for retrofits or when the deck framing can’t accommodate through-posts. Reinforcement blocking between joists is often required to handle the load.
Through-post systems feature cables that pass completely through drilled holes in solid wood or metal posts. Tensioning hardware (threaded studs or swage fittings) is installed on the end posts, and intermediate posts simply guide the cable. This creates a cleaner look with fewer visible fittings.
Fascia-mount or side-mount systems attach cables to the outer face of posts or fascia boards. They’re popular for low-profile applications or when deck boards run parallel to the railing line. Many DIY-friendly kits use this approach because drilling precise through-holes isn’t required.
Some manufacturers offer pre-assembled panel kits with cables already tensioned in a frame. These can speed up installation but may cost more per linear foot and offer less customization for non-standard deck layouts.
Materials and Hardware: Choosing the Right Components
Cable material matters. Most systems use stainless steel in one of these grades:
- 304 stainless: Suitable for most residential decks in non-coastal areas. Corrosion-resistant but can pit in saltwater environments.
- 316 marine-grade stainless: The standard for coastal or high-humidity locations. Contains molybdenum for superior rust resistance.
Cable diameter is typically 1/8″ or 3/16″. The 1/8″ size is more common for residential decks up to 42″ tall: 3/16″ adds extra stiffness and is sometimes required for taller or longer spans. Check manufacturer specs for maximum post spacing, exceeding it can cause cables to deflect or fail tension over time.
Post materials include:
- Aluminum: Lightweight, rust-proof, and available in powder-coated finishes. Posts are often hollow, so internal blocking or reinforcement may be needed.
- Stainless steel: Matches the cable finish for a monochromatic look. Expensive but nearly indestructible.
- Wood (typically 4×4 nominal): Cedar, redwood, or pressure-treated pine. Must be sealed or stained. Drilling through solid wood is straightforward, but posts can warp or twist if not properly kiln-dried.
Hardware kits should include tensioning fittings (lag studs, swage studs, or turnbuckles), cable sleeves or grommets for through-holes, and end caps. Many DIY project platforms feature custom builds using off-the-shelf hardware from marine or rigging suppliers, which can save money compared to branded kits.
Safety note: Always wear gloves and safety glasses when cutting or handling stainless cable. Cut ends are sharp and can cause serious cuts.
Installation Guide: DIY vs. Professional Installation
Wire railing is a moderate-to-advanced DIY project. Success hinges on accurate layout, post installation, and cable tensioning. Mistakes here can lead to code violations or a system that sags within months.
DIY installation steps (general overview):
- Check local codes. Most jurisdictions require guardrails on decks 30″ or higher, with cable spacing no wider than 4″ and a minimum rail height of 36″ (residential). Some municipalities have additional rules about cable systems specifically.
- Install posts. Space them according to cable manufacturer specs (often 4′ to 6′ on center for 1/8″ cable). Posts must be plumb and securely fastened. Surface-mount posts require blocking beneath the deck: through-posts should penetrate the rim joist and bolt to framing.
- Drill cable holes. Use a drill press or guide jig to keep holes straight and level. Misaligned holes cause binding and uneven tension. Holes are typically sized 1/4″ for 1/8″ cable to allow room for grommets.
- Thread and tension cables. Start at one end post, thread cable through all intermediate posts, and attach tensioning hardware at the opposite end. Tighten gradually, working from top to bottom. Use a cable tension gauge (many kits include one) to ensure uniform tightness, usually around 300–350 pounds of force for 1/8″ cable on residential decks.
- Trim and cap. Cut excess cable with a cable cutter (not bolt cutters, which can fray strands). Install end caps or finishing sleeves.
When to hire a professional:
- The deck is two stories or higher. Fall protection and load calculations become critical.
- Local code requires a stamped engineering plan for the railing system.
- The existing deck structure is questionable. A pro can assess whether posts, joists, and ledger boards can handle the lateral load.
- You lack the tools. A quality drill press, cable cutters, and tensioning tools can add $200+ to the project if purchased new.
Many woodworking-focused sites emphasize the importance of measuring twice and cutting once, this applies doubly to cable railing, where a mis-drilled post or kinked cable means starting over. Several online guides, including a detailed cable railing installation walkthrough, offer visual step-by-steps for first-timers.
Permit requirements: Most deck railing projects require a building permit, especially if you’re replacing an existing system or building new. The inspector will check post spacing, cable tension, and rail height. Plan for at least one site visit.
Cost Breakdown: What to Expect for Your Wire Railing Project
Wire railing costs more upfront than wood balusters but can be competitive with composite or ornamental metal systems. Pricing varies widely based on materials, labor, and regional markets.
Material costs (per linear foot, approximate):
- DIY kit (aluminum posts, 1/8″ stainless cable, hardware): $60–$100/linear foot
- Premium kit (stainless posts, 3/16″ cable, marine-grade fittings): $120–$180/linear foot
- Bulk cable and hardware (no posts): $20–$40/linear foot if sourcing components separately
Additional expenses:
- Posts and caps: $30–$80 per post (wood is cheaper: stainless or powder-coated aluminum costs more)
- Top rail (if not included): $5–$15/linear foot for wood or aluminum cap rail
- Tools (if not owned): Drill press or jig ($50–$150), cable cutters ($30–$60), tension gauge ($20–$40)
Professional installation typically runs $100–$200 per linear foot, including materials and labor. Complex layouts, stairs, or structural reinforcement add to the cost.
Example: A 12′ x 16′ elevated deck with railing on three sides (44 linear feet) might cost:
- DIY with mid-range kit: $2,600–$4,400 in materials
- Professional install: $4,400–$8,800 total
Long-term savings: Wire railing requires virtually no maintenance compared to wood balusters that need annual staining or composite systems that can fade or crack. Over a 10–15 year lifespan, the lack of upkeep balances the higher initial investment.
Cost-saving tips:
- Buy cable and fittings in bulk from marine or rigging suppliers instead of branded kits.
- Use pressure-treated 4×4 posts instead of metal if aesthetics allow.
- Install yourself if confident in your carpentry skills and ability to follow tensioning specs.
Maintenance and Care for Long-Lasting Performance
Wire railing is low-maintenance, but it’s not zero-maintenance. Stainless steel cables can accumulate dirt, pollen, or salt residue, and hardware can loosen over time.
Routine cleaning:
- Wipe cables with a damp microfiber cloth every few months. For stubborn grime, use mild dish soap and water.
- Avoid abrasive cleaners or steel wool, which can scratch the stainless finish and create corrosion points.
- In coastal areas, rinse cables monthly with fresh water to remove salt buildup.
Tension checks:
Cables can relax slightly as the system settles, especially in the first year. Walk the deck and press on each cable, if it deflects more than about 1/4″, retighten the tensioning hardware. Most systems use a hex key or wrench to adjust threaded studs.
Inspect fittings annually:
Check end fittings, grommets, and post attachments for corrosion, cracking, or movement. Tighten any loose bolts or lag screws. Replace any hardware showing rust stains or metal fatigue.
Wood post care (if applicable):
Seal or stain wooden posts every 2–3 years to prevent rot and warping. Inspect for splits or twisting that could affect cable alignment.
Safety reminder: Handrails should remain secure and meet code. If any post feels wobbly or cables show signs of fraying, address the issue immediately. Wire railing under tension can snap if hardware fails, posing a serious injury risk.
With proper installation and occasional upkeep, a quality wire railing system can last 20+ years without major repairs.
Conclusion
Wire railing combines modern style, durability, and open views in a system that suits a wide range of deck designs. While the upfront cost and installation precision are higher than traditional balusters, the payoff comes in decades of low-maintenance performance and a clean, contemporary look that doesn’t go out of style. Whether tackling the project solo or hiring a pro, understanding materials, code requirements, and tensioning techniques ensures a safe, code-compliant result that enhances any outdoor space.