Table of Contents
ToggleSmall bathroom showers present a unique design challenge: how to create visual impact without overwhelming the space. The right tile choices can transform a cramped shower enclosure into a stylish focal point that actually feels larger than its square footage. Tile selection goes beyond aesthetics, it affects perceived dimensions, light reflection, maintenance needs, and even resale value. Whether tackling a full gut renovation or a cosmetic refresh, understanding how tile size, color, pattern, and finish interact with confined spaces helps homeowners make decisions that balance style with spatial psychology.
Key Takeaways
- Shower tile ideas for small bathrooms should prioritize light-colored porcelain and large-format tiles to create an airy, spacious feel through better light reflection and fewer visual interruptions.
- Vertical tile patterns and plumb wall installation elongate the perceived height of compact shower spaces, counteracting the boxy compression typical of small enclosures.
- Large-format tiles (12″ x 24″ or larger) require precise substrate flatness within 1/8″ over 10 feet and professional installation to prevent lippage, making them a strategic investment in perceived space expansion.
- Strategic accent walls, recessed niches, and contrasting grout patterns add visual interest without overwhelming tight quarters—limit designs to one focal point to maintain a cohesive look.
- Glass and reflective tiles multiply available light in windowless showers but demand daily maintenance to prevent water spotting, requiring homeowners to weigh aesthetic benefits against cleaning routines.
- Proper waterproofing with IRC-compliant backerboard and membranes is non-negotiable in small showers, as failed waterproofing leads to expensive mold and structural damage that override any short-term cost savings.
Why Tile Choice Matters in Small Bathroom Showers
In tight quarters, every material decision carries weight. Tile selection directly influences how spacious a shower feels, how much natural and artificial light gets amplified, and how easily the space stays clean.
Visual expansion is the primary concern. Dark or busy tiles can close in walls, while the wrong grout width creates a gridded effect that chops up surfaces. Conversely, strategic tile choices create sightlines that trick the eye into perceiving more volume.
Maintenance realities also shift in small showers. More grout lines mean more scrubbing and resealing. In a 36″ x 48″ fiberglass pan replacement or tiled shower base, grout cleaning becomes a weekly chore rather than a monthly one if tile size isn’t considered. Porcelain and glazed ceramic resist mildew better than natural stone, which requires sealing and can stain from soap scum in cramped, high-humidity enclosures.
Building code compliance remains constant regardless of bathroom size. The International Residential Code (IRC) requires water-resistant backerboard (cement board, foam board, or equivalent) behind all shower tile, with proper waterproofing membrane overlaps. Small spaces tempt shortcuts, but failed waterproofing leads to mold and structural rot, permit-required fixes that cost far more than doing it right initially.
Finally, tile choice impacts resale appeal. Outdated 4″ x 4″ builder-grade ceramic signals deferred maintenance, while contemporary tile treatments suggest a well-maintained home. In markets where every bathroom counts, a thoughtfully tiled shower becomes a competitive advantage.
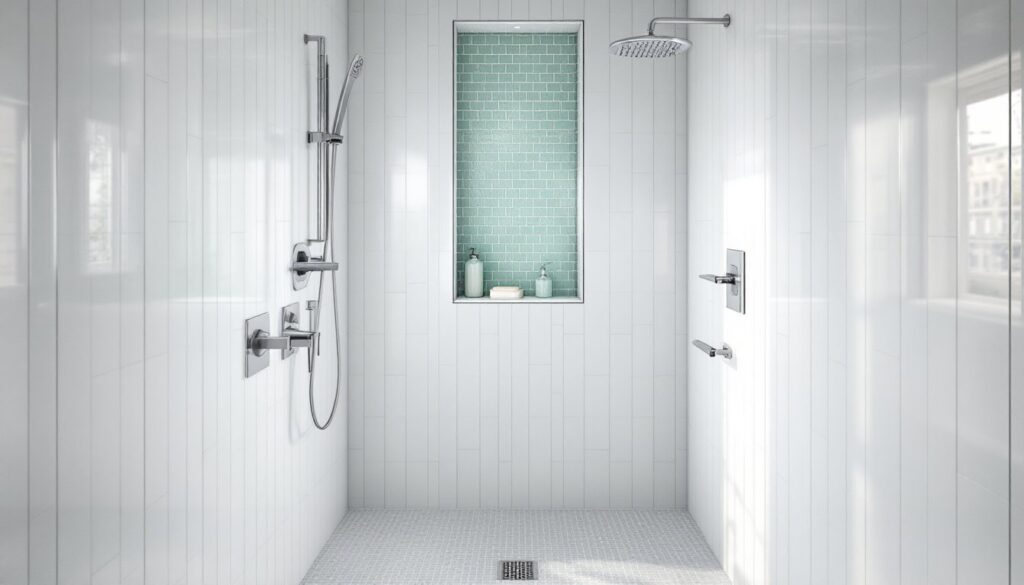
Light-Colored Tiles to Create an Airy Feel
Pale palettes reflect rather than absorb light, making shower enclosures feel less cave-like. This isn’t about sterile white-on-white: it’s about maximizing the light return in a space that typically has minimal or zero natural light.
White and off-white porcelain tiles remain the workhorse choice. Glossy finishes reflect overhead lighting and any window light, doubling the perceived brightness. Matte finishes hide water spots better but sacrifice some of that light-bouncing effect. For slip resistance on shower floors, choose textured or smaller-format tiles (2″ x 2″ mosaics provide adequate grip even when wet).
Soft grays, beiges, and warm taupes add subtle dimension without darkening the space. A light greige (gray-beige hybrid) subway tile creates depth while maintaining airiness. Many design communities focused on small space living emphasize these neutral bases because they pair with virtually any accent color in towels, hardware, or cabinetry.
Cool-toned blues and seafoam greens work in showers with adequate lighting. These hues evoke spa-like calm but can read dark in poorly lit spaces. Test samples in the actual shower location under both natural daylight and evening artificial light before committing to full boxes.
Grout color matters significantly. White grout on white tile creates a seamless look but shows mildew quickly in humid climates. Light gray grout (Mapei Keracolor in Pewter or similar) hides discoloration while maintaining the overall light palette. Avoid stark contrasts, white tile with black grout creates a busy grid that shrinks perceived space.
One practical note: light-colored natural stone (Carrara marble, white travertine) requires more maintenance than porcelain lookalikes. In small showers where water sits longer, natural stone etches from acidic shampoos and requires annual sealing. Porcelain alternatives offer the same aesthetic with near-zero maintenance.
Large Format Tiles for a Seamless, Spacious Look
Fewer grout lines mean less visual interruption, a key principle when expanding perceived space. Large format tiles (12″ x 24″ and up) create continuous planes that let the eye travel uninterrupted across surfaces.
12″ x 24″ rectified porcelain is the sweet spot for most small showers. Rectified edges allow for tight 1/16″ grout joints, creating an almost slab-like appearance. Install these vertically on walls for added height (see next section) or horizontally for width. A single row of five 12″ x 24″ tiles covers a standard 8-foot ceiling height with minimal cutting.
Large-format slabs (3′ x 5′ or larger) take the concept further, essentially wallpapering the shower with minimal seams. These require professional installation, the weight and rigidity demand perfect substrate prep and specialized handling. Epoxy thin-set and lippage control systems (tile leveling clips) are non-negotiable. This is not a DIY project unless you have commercial tiling experience and proper tools.
Horizontal vs. vertical installation changes the visual impact. Horizontal planks (8″ x 48″ wood-look porcelain, for instance) widen narrow showers. Vertical installation elongates height. In a typical 60″ x 32″ tub-to-shower conversion, vertical 12″ x 24″ tiles draw the eye upward, making the 8-foot ceiling feel taller.
Challenges with large-format tile include substrate flatness requirements. Any dips or humps in the cement board telegraph through large tiles as lippage (edges that don’t align). The substrate must be flat within 1/8″ over 10 feet, stricter than the 1/4″ tolerance acceptable for smaller tiles. Use a straightedge to check studs and shimming before hanging backerboard.
On shower floors, large format works only with proper slope. Pre-sloped foam pans or mortar beds must drain at 1/4″ per foot minimum toward the drain. Large floor tiles in a small shower base sometimes require strategic cuts to maintain slope without creating trip hazards. A 2″ x 2″ mosaic sheet remains the safer, code-compliant choice for most DIY shower pans.
Vertical Tile Patterns to Add Height
Drawing the eye upward counteracts the boxy compression of small showers. Vertical patterns leverage the same psychological trick used in clothing: vertical lines elongate.
Vertical subway tile installation flips the classic horizontal brick pattern on its side. Standard 3″ x 6″ subway tiles run floor to ceiling, creating pronounced vertical lines. This works especially well in showers with lower ceilings (7 feet or under) where horizontal patterns accentuate the lack of height.
Stacked vertical patterns (tiles aligned rather than offset) amplify the effect. Instead of a running bond (offset by half), stack tiles directly above each other. The continuous vertical grout lines act like pinstripes. Use rectified tiles with minimal grout joints (1/16″) to keep lines crisp. Unsanded grout works best at this joint width.
Linear mosaic tiles in vertical orientation offer texture with the same height-enhancing effect. Glass or porcelain mosaics in 1″ x 6″ or 2″ x 12″ formats create shimmering vertical ribbons. These cost more per square foot ($12–$25 vs. $3–$8 for standard ceramics) but require less material in small showers, a 32-square-foot enclosure needs only 35–40 square feet with waste factor.
Vertical accent strips break up solid fields without losing the upward momentum. A single 4″-wide column of contrasting mosaic flanked by large-format tiles adds interest while maintaining vertical emphasis. Place these strategically, on the back wall opposite the showerhead, or flanking a niche.
Installation tip: Vertical patterns demand plumb walls. Check walls with a 4-foot level before tiling. Out-of-plumb walls become glaringly obvious when vertical grout lines lean. Shimming the backerboard or using thicker thin-set beds can correct minor issues, but walls more than 1/4″ out over 8 feet may need stud correction, a pre-tile framing fix.
Accent Walls and Niches for Visual Interest
Strategic contrast prevents monotony without overwhelming limited square footage. An accent wall or detailed niche provides a focal point that organizes the visual hierarchy.
Single-wall treatments concentrate pattern or color on one surface, typically the back wall opposite the shower entry. A mosaic feature wall in stacked stone, hexagonal tiles, or patterned encaustic tiles creates depth. Keep the remaining three walls neutral. A 3′ x 5′ back wall in a 36″ x 48″ shower is roughly 15 square feet, a manageable splurge for premium tile ($15–$30/sq ft) that would break the budget if used throughout.
Horizontal accent bands break up tall walls. A 12″-wide stripe of contrasting tile at shoulder height (around 54″–60″ from the floor) adds visual interest without chopping the space into tiny segments. Many bathroom remodel projects feature this detail because it’s DIY-friendly, straight horizontal cuts and minimal pattern-matching.
Recessed niches serve double duty as storage and design focal points. Frame these with contrasting tile or the same mosaic used on an accent wall. Standard niche sizing between studs (14.5″ wide if centered between 16″ on-center framing) provides shampoo storage without protruding into elbow room. Waterproof the niche thoroughly, the recessed shelf is a common leak point. Use a pre-formed niche with integrated waterproofing (Schluter Kerdi-Board niche, for example) or apply liquid waterproofing membrane with extra coats on all inside corners.
Contrasting grout as an accent creates pattern without additional materials. White tile with charcoal grout on one wall and matching white grout elsewhere differentiates surfaces. This technique works best with geometric tiles (hexagons, diamonds, or subway) where grout lines form clear patterns.
Avoid over-accessorizing in tight spaces. One accent wall or a detailed niche, rarely both. Multiple competing focal points create visual clutter. Similarly, limit tile types to two or three throughout the shower. More variety reads as chaotic in spaces under 50 square feet.
Glass and Reflective Tiles to Bounce Light Around
Reflective surfaces multiply available light, critical in small showers that often lack windows. Glass and high-gloss tiles act like mirrors, expanding perceived dimensions.
Glass subway tiles in 3″ x 6″ or 4″ x 12″ formats provide the classic subway look with built-in luminosity. The transparency and reflectivity brighten showers significantly compared to ceramic equivalents. Installation requires white thin-set, gray thin-set shows through translucent glass. Apply thin-set to the wall only (not the tile back) to prevent trowel lines from telegraphing through. Glass is unforgiving: any ridges or voids show.
Glass mosaic sheets in 1″ x 1″ or hexagonal patterns add texture and sparkle. These work especially well as accent walls or niche backs. Coverage runs about 95 square feet per gallon of thin-set for mosaics (vs. 125 sq ft for larger tiles) due to increased surface area. Use unsanded grout, sanded versions scratch glass surfaces.
Metallic and iridescent finishes on porcelain tiles deliver reflectivity with better durability than pure glass. Glazes with embedded mica or pearlescent pigments catch and scatter light. These work best as accents: a full shower in iridescent tile can feel overwhelming and dated quickly.
High-gloss porcelain offers a compromise, reflective surface with porcelain’s stain resistance and durability. Polished porcelain tiles (sometimes labeled “pulido” or “polished”) deliver near-glass reflectivity. Slip resistance is critical on floors: reserve glossy tiles for walls and use textured or matte finishes underfoot. The Americans with Disabilities Act (ADA) recommends a wet DCOF (Dynamic Coefficient of Friction) of 0.42 or higher for accessible showers, most polished tiles fall well below this.
Mirror tiles (actual mirrored glass) are niche products best left to professional installation in steam showers or spa-style applications. They require specialized adhesives, perfect substrates, and careful moisture management. For typical residential bathrooms, they’re overkill and maintenance headaches (constant water spot visibility).
Practical trade-offs: Glass and glossy tiles show water spots and soap scum more readily than matte finishes. In hard-water areas, this means daily squeegeeing to maintain the sparkle. Evaluate whether the light-enhancing benefit outweighs the extra cleaning, or choose semi-gloss finishes that balance reflectivity with spot resistance. Curated design guides often highlight this maintenance reality alongside aesthetic benefits.
Conclusion
Small shower spaces reward intentional tile choices that balance visual expansion with practical maintenance. Light palettes, large formats, vertical patterns, strategic accents, and reflective surfaces each contribute to a more spacious feel, but the magic happens when these strategies work together rather than compete. Before purchasing materials, mock up samples in the actual space under real lighting conditions, and consider how tile choices interact with the existing plumbing, storage needs, and cleaning routines that make daily use pleasant rather than frustrating.